HTML/JAVA

Showing posts with label embroidery floss. Show all posts

Monday, 15 July 2013

Extreme Beading

My Turkish camel piece is still being worked on. As you can see the beading has begun.  This piece has been in stages for nine months now. I had a full Saturday in my studio when I had set everything up to start quilting it. Well...you know what they say to best laid plans...it didn't work out very well. I've elaborated below if you're interested.


This project just didn't want to be machined. I did something that I never do. I stitched & ripped out all day long. Every time I started I would end up ripping it out. This was my whole day in the studio. Then I just decided that this piece just didn't want to be machine quilted. So now it's all up to hand embroidery & beading. Oh my goodness it'll be many more months before it's completed.
I asked my husband to source out an audio book for me so that I could be in my studio quietly so as to not disturb my son. This is also something that never happens. I love music in the studio...something that I don't think about...just work through. The next Saturday in the studio was very rewarding. I can't sit or stand for great lengths so I break it up and do many things during the day. I was very happy with the beading and Sunday morning I thought that I would quietly slip back to the studio for another day of audio & hand work. To my surprise, my audio book was complete within minutes. I actually burned through 10 hours of audio on Saturday without having any clue as to the amount of time spent. I was literally shocked. I have never counted time in the studio so I was completely clueless. The next shock...was how little seems to be done. I still have over 3/4 of the project to go through. The picture doesn't show the whole of the beaded area...just a taster.

Tuesday, 11 December 2012

Mr. Boston ATC

This ATC (Artist Trading Card) was made for the GOE monthly meeting exchange. I was playing around with a different colour for me. I really wanted it to be red but for some reason it looks more pink. I started off with card stock, overlaid with white & printed tissue. Then I added a Boston postage stamp that I had in my stash & worked water over the tissue until it framed the stamp the way I wanted. I then dry brushed some bronze Lumiere paint for accent & used some rubbing alcohol to remove some of the excess paint so that some of the printed tissue would show through. I put it aside at that point because I wasn't sure it was finished but didn't know what I could do to be more interesting. So the next night I added some random hand stitching and then it was finished. I really love the texture you can get with the tissue. I should know who the person on the stamp is...but sorry I don't...at least not at this point. Maybe someone will enlighten me.

Sunday, 21 October 2012

Peace Out

This peace has been worked on over a period of many months. I would do a little bit and then leave it to manifest in my brain until the next step would come. As usual the steps would come to me slowly through my dreams. Then I would get the idea and rush to the studio to do that step before it got lost in the abyss of daily life. Over the months I had it on the corner of my table, as it patiently waited...putting beads on it...laying similar colours on it until something would click. Now I'm still waiting for a hanging idea. I've played with wood and antler but everything just seems a little too heavy. So I'll have to wait until the perfect item arrives in my studio. But for now that's all it's waiting for.
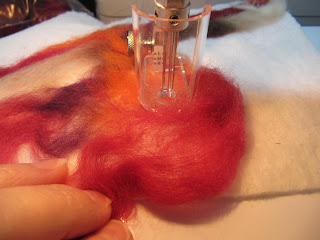
I began with a piece of cotton batting and started layering wool rovings to it.

As you can see, it's nothing at this point but a dogs breakfast.

Then I took some yarn that's in my stash and started layering it.

I had selected yarns that I though would look good together and I would add them by twisting and bunching them together so that I would get a very raised nobly effect. At this point, I'm still not sure this is working.


This is the stage that I stopped in order to get a true feeling for it. I knew that it needed more but I just had to let it manifest before moving on.

Unfortunately I didn't continue to take pictures of the next stages. I decided that I would add some hand stitched elements to it but because of the nobly effect, anything too small would have gotten lost in the yarn.


This is a more detail shot of the hand stitching. After the hand stitching step, once again the piece was laid to rest until the next step arrived. During that time I was reading a book called "Hot Textiles" and decided that I needed to have some Xpandaprint. When the Xpandaprint came in it sat on the shelf waiting for me to be brave enough to try it. Then one night the next step came & I was in the studio. I got the felting machine back out and felted some areas more deeply in order to have a place to add the Xpandaprint. Xpandaprint is a type of puff medium. When you heat it, it puffs up. So I heated the areas, then painted over it. Then, I added Dorlands wax medium on top of the painted medium, added beads and suddenly "Peace Out" was born.

This is just a another detailed shot.
This piece is called "Peace Out" because of a very good friend of mine. Most families go through very tough times in their lives with their children...some are worse than others...but it's a time when all we pray for is peace. One time, this friend, signed off her email to me as "peace out" and I thought it was just so funny...so raw...and this piece just seemed to name itself as it developed. Some symbols just seem to evoke a sense of peace and for me it's Buddha...don't know why...can't explain it...I have one in my garden as a meditation, reflective spot and I also have one in my home.

Tuesday, 1 May 2012

Frankensteined

Well, I've been working for a week and getting nowhere. It started with an article from the Quilting Arts Magazine, February/March 2012 issue. The article is called Surfaces for Stitch in which this wonderful lady named Pauline Verrinder  gives directions on how to make art cloth from Gesso, cheesecloth & newspaper. I just loved this article and what she made was fabulous. The Group of Eight's (GOE), challenge for next quarter is to do something with an article in a newspaper. So naturally I though I had something that I could produce and be done my challenge way before the due date. Ha ha...that's not happening. I'm a very nervous person and always want to put my best effort on everything that I do and I was discussing this with the group and telling them how I really stress over the challenges. The group was very supportive and told me to just have fun and that I could make something as small as an ATC for submission. So I really thought I had this one in the bag. I started out so bloody positive but all I got was positively frustrated. I followed the directions but I guess I'm just not very intuitive when it comes to paints because you wouldn't believe how many layers I added to try and get the right combination. Then when all I got was a friggin mess...I'd paint over it with a solid colour in frustration. I couldn't get the layers to stay down like the article was describing. As soon as it dried the layers seemed loose...so out came the glue, more gesso or even molding paste was added. I ended up with nothing like the article. After my first try with nothing that resulted in anything like art cloth,  I asked my husband to read the article and see if I'm missing anything. He read the article and had a few suggestions. So on Friday night I came home again ready to adorn the apron and dig in again. I worked for over 3 hours and the next morning I went up to the studio and painted the whole dam thing metallic blue and started over. This article is going to do some traveling with me so that I can get some expert advice from my fibre friends. Maybe I'll have more to show but for now take a look at the below pictures. They are not in sequence so I've numbered them in the caption of where I started and what I ended up with.


This was my third piece that my husband says needs to be called "Frankenstein something" because of the stitching. The newspaper article is not recognizable at all. It was suduko puzzles and that's why they have numbers painted on the pieces.
This is a detailed shot. I think I'm going to frame this one anyways because it's growing on me a little. Maybe I just want to salvage something of my week.
This was my first try. Up close I really love the texture that I got...but it's nothing like the article. I wish I could show the article but I don't want to get in trouble with the copyright police.
This is the second one I did after my husband read the article and gave me his suggestions. We you can see some of the newspaper article in this one...but it just doesn't do anything for me at all. I even had the Golden glass bead medium out on this one. Up close you can see the beads and how they give it a little glitz. Again nothing like the original article from QA. You can see why I needed some help on it right. I was loosing sleep...and everything works in theory.